
I perfected an easy no bake Peanut Butter Bars recipe that channels classic Buckeye Squares, pairing a peanut butter center with a chocolate coating and a pantry surprise you’ll want to know about.
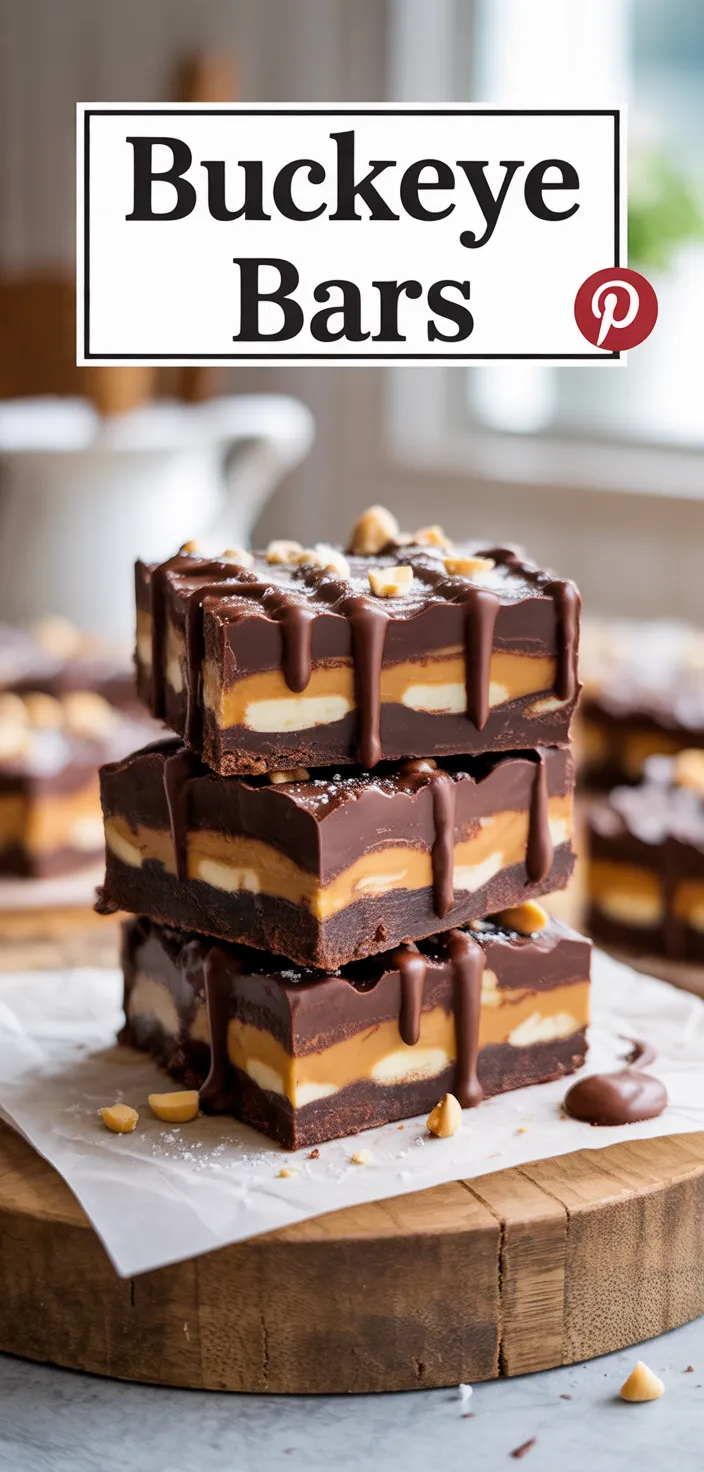
I made these Buckeye Bars on a dare and now I cant stop thinking about them. They are that exact thrill of creamy peanut butter wrapped in glossy semisweet chocolate chips, every bite soft and a little addicting.
I keep telling myself one more square and then suddenly theres none left. Some people call them Buckeye Squares, others whisper Peanut Butter Reeses Bars like it will make them taste better.
Im not even mad, just curious how something this simple gets so rich. If you like a sweet that disappears fast, you might want to hide the pan.
Ingredients
- Adds richness and moisture, mostly fat, little nutrients, makes filling smooth and tender.
- provides protein and flavor, salty sweet, gives peanut punch and creamy texture.
- Crunchy base, it’s mostly carbs and fiber, gives graham flavor and light bite.
- Pure sweetness, very fine, boosts sweetness and slightly changes texture, mostly simple carbs.
- tiny splash of warmth, aromatic, no calories but lifts flavors, classic pantry hero.
- Adds bittersweet coating, some antioxidants, mostly sugar and fat, makes bars decadent.
- Used to loosen chocolate, neutral fat, adds sheen and easier dipping if needed.
- Balances sweetness, enhances peanut and chocolate flavors, very small sodium boost.
Ingredient Quantities
- 1 cup unsalted butter softened
- 1 cup creamy peanut butter
- 2 cups graham cracker crumbs
- 2 cups powdered sugar
- 1 teaspoon vanilla extract
- 12 ounces semisweet chocolate chips
- 1 to 2 tablespoons vegetable oil or shortening optional
- pinch of salt optional
How to Make this
1. Line an 8×8 inch pan with parchment or foil, leave some overhang so you can lift the bars out later.
2. In a medium bowl, cream 1 cup softened unsalted butter with 1 cup creamy peanut butter until smooth and kinda fluffy, then stir in 1 teaspoon vanilla and a pinch of salt if you want it to pop.
3. Add 2 cups graham cracker crumbs and 2 cups powdered sugar, mix until it forms a thick, evenly combined dough that holds together. If it seems too dry, add a teaspoon or two more peanut butter.
4. Press the peanut butter mixture firmly and evenly into the prepared pan so the layer is compact and smooth on top. Press real good or the bars will crumble later.
5. Chill the pan in the fridge for at least 30 minutes, until the layer is firm to the touch.
6. Melt 12 ounces semisweet chocolate chips with 1 to 2 tablespoons vegetable oil or shortening if you want a shinier, smoother top. Microwave in 20 to 30 second bursts, stirring each time, or melt over a double boiler. Stop when glossy and fully melted, dont overheat.
7. Pour the melted chocolate over the chilled peanut layer and spread it evenly with a spatula. Tap the pan on the counter to remove air bubbles and smooth the surface. You can sprinkle a tiny extra pinch of salt on top if you like sweet-salty.
8. Return to the fridge and chill until the chocolate is fully set, about 1 hour or longer.
9. Use the parchment overhang to lift the slab out, then cut into bars. For cleaner slices warm your knife under hot water, dry it off, and wipe between cuts.
10. Store in an airtight container in the fridge for up to a week, or freeze for longer.
Equipment Needed
1. 8×8 inch baking pan, lined with parchment or foil with some overhang so you can lift the slab out later
2. Medium mixing bowl
3. Electric hand mixer or a sturdy wooden spoon for creaming the butter and peanut butter
4. Measuring cups and measuring spoons
5. Rubber spatula for scraping the bowl and pressing the peanut mixture into the pan
6. Microwave safe bowl or a heatproof bowl plus a saucepan if you prefer a double boiler to melt the chocolate
7. Offset spatula or flat spatula to spread the chocolate smoothly
8. Sharp knife and cutting board, plus a cup of hot water to warm the knife between slices (quick trick)
9. Airtight container for storing the bars in the fridge or freezer
FAQ
Buckeye Bars Recipe Substitutions and Variations
- Unsalted butter: swap with salted butter (use same amount, skip any extra salt) or use vegan butter or coconut oil 1:1 for a dairy free version, but bars may be a bit softer.
- Creamy peanut butter: use natural peanut butter (stir the oil back in, same amount) or swap for almond or cashew butter 1:1; sunflower seed butter works if you need nut free.
- Graham cracker crumbs: substitute crushed digestive biscuits, vanilla wafers, or shortbread cookies 1:1; crushed pretzels give a nice sweet and salty twist.
- Semisweet chocolate chips: use chopped dark or milk chocolate bars, or candy coating/almond bark for easier melting; if your chocolate seems thick add 1 tsp vegetable oil to smooth it out.
Pro Tips
– Press the peanut layer really firmly with the flat bottom of a measuring cup or a spatula so the bars hold together and don’t crumble when you cut them. Put another sheet of parchment on top while pressing to get a super smooth surface.
– Melt the chocolate slowly and keep water away, stir often, and add oil or shortening just a teaspoon at a time for gloss and easier spreading. If the chocolate starts to seize, a little warm oil or a spoonful of cream can often rescue it.
– Sprinkle flaky sea salt on the chocolate while it’s still wet for a bright sweet-salty contrast, and toast the graham crumbs briefly if you want extra depth and nuttiness.
– For clean cuts and nice-looking bars, chill fully, lift the slab out on the parchment, then warm a sharp knife under hot water, dry it, and wipe between each cut; store bars in an airtight container with parchment between layers or freeze for longer keeping.
Buckeye Bars Recipe
I perfected an easy no bake Peanut Butter Bars recipe that channels classic Buckeye Squares, pairing a peanut butter center with a chocolate coating and a pantry surprise you'll want to know about.
16
servings
421
kcal
Equipment: 1. 8×8 inch baking pan, lined with parchment or foil with some overhang so you can lift the slab out later
2. Medium mixing bowl
3. Electric hand mixer or a sturdy wooden spoon for creaming the butter and peanut butter
4. Measuring cups and measuring spoons
5. Rubber spatula for scraping the bowl and pressing the peanut mixture into the pan
6. Microwave safe bowl or a heatproof bowl plus a saucepan if you prefer a double boiler to melt the chocolate
7. Offset spatula or flat spatula to spread the chocolate smoothly
8. Sharp knife and cutting board, plus a cup of hot water to warm the knife between slices (quick trick)
9. Airtight container for storing the bars in the fridge or freezer
Ingredients
-
1 cup unsalted butter softened
-
1 cup creamy peanut butter
-
2 cups graham cracker crumbs
-
2 cups powdered sugar
-
1 teaspoon vanilla extract
-
12 ounces semisweet chocolate chips
-
1 to 2 tablespoons vegetable oil or shortening optional
-
pinch of salt optional
Directions
- Line an 8×8 inch pan with parchment or foil, leave some overhang so you can lift the bars out later.
- In a medium bowl, cream 1 cup softened unsalted butter with 1 cup creamy peanut butter until smooth and kinda fluffy, then stir in 1 teaspoon vanilla and a pinch of salt if you want it to pop.
- Add 2 cups graham cracker crumbs and 2 cups powdered sugar, mix until it forms a thick, evenly combined dough that holds together. If it seems too dry, add a teaspoon or two more peanut butter.
- Press the peanut butter mixture firmly and evenly into the prepared pan so the layer is compact and smooth on top. Press real good or the bars will crumble later.
- Chill the pan in the fridge for at least 30 minutes, until the layer is firm to the touch.
- Melt 12 ounces semisweet chocolate chips with 1 to 2 tablespoons vegetable oil or shortening if you want a shinier, smoother top. Microwave in 20 to 30 second bursts, stirring each time, or melt over a double boiler. Stop when glossy and fully melted, dont overheat.
- Pour the melted chocolate over the chilled peanut layer and spread it evenly with a spatula. Tap the pan on the counter to remove air bubbles and smooth the surface. You can sprinkle a tiny extra pinch of salt on top if you like sweet-salty.
- Return to the fridge and chill until the chocolate is fully set, about 1 hour or longer.
- Use the parchment overhang to lift the slab out, then cut into bars. For cleaner slices warm your knife under hot water, dry it off, and wipe between cuts.
- Store in an airtight container in the fridge for up to a week, or freeze for longer.
Notes
- Below you’ll find my best estimate of this recipe’s nutrition facts. Treat the numbers as a guide rather than a rule—great food should nourish both body and spirit. Figures are approximate, and the website owner assumes no liability for any inaccuracies in this recipe.
Nutrition Facts
- Serving Size: 81g
- Total number of serves: 16
- Calories: 421kcal
- Fat: 27.4g
- Saturated Fat: 13.3g
- Trans Fat: 0.13g
- Polyunsaturated: 3.25g
- Monounsaturated: 10.7g
- Cholesterol: 38.1mg
- Sodium: 97.3mg
- Potassium: 156.3mg
- Carbohydrates: 42.3g
- Fiber: 3.75g
- Sugar: 31.3g
- Protein: 6.47g
- Vitamin A: 450IU
- Vitamin C: 0mg
- Calcium: 19.7mg
- Iron: 1.16mg


