
Step into my kitchen and prepare to embark on a mini dessert adventure with me! We’re talking bite-sized cheesecakes with a buttery graham cracker crust and a creamy, dreamy filling that’s like a hug for your taste buds. Get ready to impress yourself with how easy and delicious these little delights are!
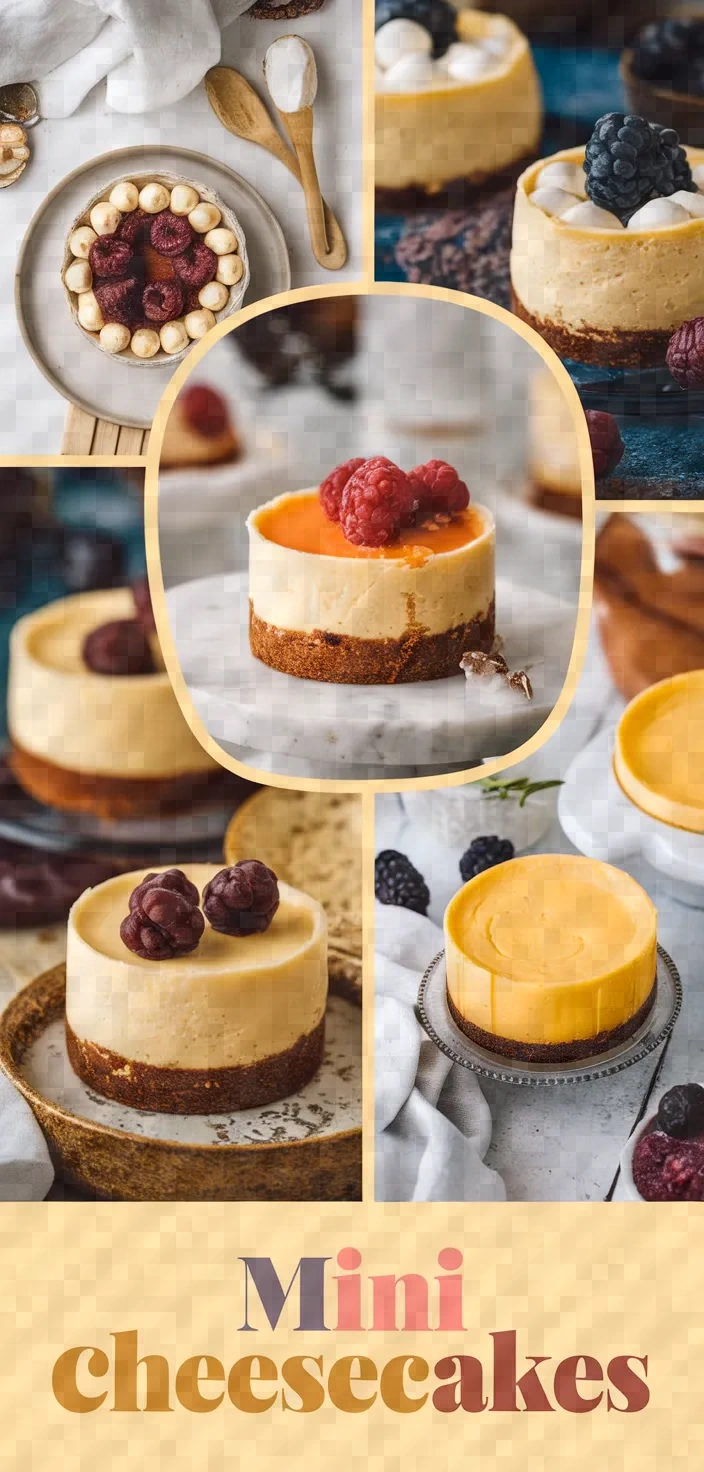
The rich creaminess of my mini cheesecakes is something I adore. They have buttery graham cracker crusts and dreamy cream cheese, vanilla, and sour cream fillings—okay, one filling, but it has three main components.
And I love it. The hint of sweetness that makes it a dessert is what keeps it from being a snack (not that I have anything against that).
But these are not part of any meal plan, save for “your plan to put these in your mouth and enjoy them.”
Ingredients
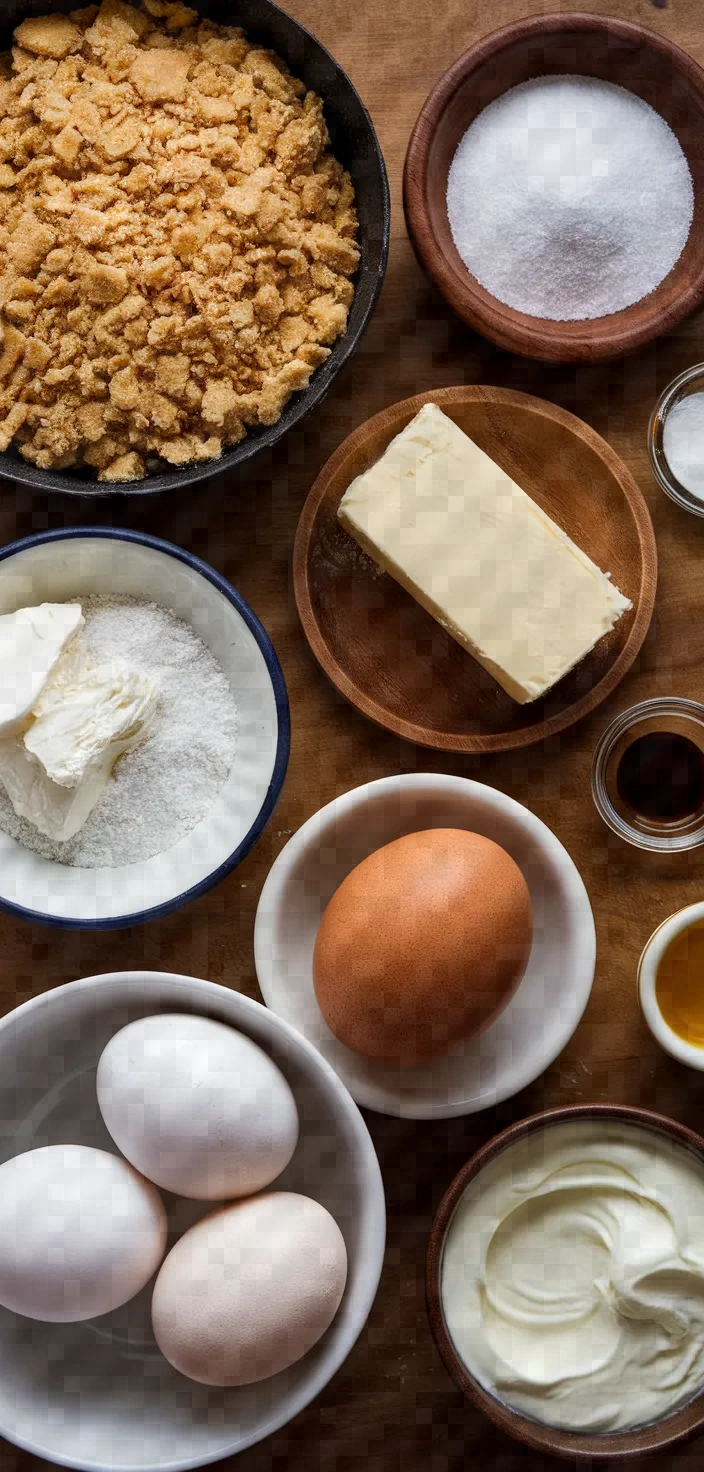
- Graham cracker crumbs: Provide carbohydrates and add a sweet, crunchy base.
- Cream cheese: Offers creamy texture, rich in fats and protein.
- Granulated sugar: Adds sweetness and balances tangy flavors.
- Vanilla extract: Enhances flavor with a sweet, aromatic touch.
- Eggs: Bind the mixture and contribute protein and richness.
- Sour cream: Adds tanginess and smooth texture.
- Heavy cream: Increases richness and creamy consistency.
Ingredient Quantities
- 1 cup (120g) graham cracker crumbs
- 2 tablespoons (25g) granulated sugar
- 4 tablespoons (56g) unsalted butter, melted
- 16 ounces (450g) cream cheese, softened
- 1/2 cup (100g) granulated sugar
- 1 teaspoon vanilla extract
- 2 large eggs
- 1/4 cup (60ml) sour cream
- 1/4 cup (60ml) heavy cream
How to Make this
1. Set your oven for 325 degrees Fahrenheit (163 degrees Celsius) and prepare a muffin tin that holds 12 cups by putting in paper liners.
2. In a tiny bowl, amalgamate graham biscuit crumbs, 2 tablespoons of sugar, and melted butter. Stir until the crumbs are uniformly damp.
3. Distribute the crumb mixture among the muffin cups, pressing it firmly into the bottom to form the crust.
4. In a spacious mixing bowl, combine softened cream cheese and sugar. Beat them together until they’re a smooth and creamy mixture.
5. Add the vanilla extract and mix to blend.
6. One at a time, beat in the eggs, making sure each is completely incorporated before adding the next.
7. Blend in the sour cream and heavy cream, stirring just until smooth.
8. Distribute the cheesecake batter evenly over the prepared crusts in the muffin cups.
9. Cook for 18-20 mins, or until the insides are firm yet still a little wobbly. Don’t let them bake too long.
10. Let cheesecakes cool to room temperature. Then refrigerate them for at least 2 hours before serving.
Equipment Needed
1. Oven
2. Muffin tin (12-cup)
3. Paper liners
4. Small mixing bowl
5. Large mixing bowl
6. Mixing spoon or spatula
7. Electric mixer or whisk
8. Measuring cups
9. Measuring spoons
10. Spoon or spatula for distributing batter
FAQ
- Can I use low-fat cream cheese?Certainly, it is permissible to use low-fat cream cheese, but you cannot expect the same results in texture and richness that you would get from a more traditional recipe. The same goes for any recipe that calls for a more healthful cream cheese. You can expect a direct trade-off between a healthier cream cheese and the cheesecake’s iconic mouth feel and flavors. The cream cheese may also be more difficult to work with once it’s been whipped.
- How do I store these mini cheesecakes?Keep them in an airtight container in the fridge for no more than 5 days.
- Can I freeze the mini cheesecakes?Certainly, freezing is an excellent way to preserve the food. They can be frozen for that long and still maintain quality. When you wrap them, be sure to use plastic wrap first; because they are high-fat foods, they mandate a fat barrier to maintain fresh flavor. Then follow with a layer of aluminum foil for further insulation, and into the freezer they go. You have about a 2-month window with these before freezer burn starts to set in.
- What is the best way to prevent cracks in the cheesecakes?Don’t mix the batter too well and bake the cheesecakes in a water bath to maintain even temperatures and prevent cracks.
- Can I use a different crust than graham cracker crumbs?Certainly, you have the option to use substitutes such as crushed cookies or digestive biscuits for the base.
- Can I add flavors or toppings?Certainly! Think about incorporating lemon zest, chocolate chips, or a fruit topping to amplify the flavor.
- What’s the best way to ensure the cream cheese is softened?Allow the cream cheese to sit at room temperature for about 30 minutes, or soften it in the microwave, using 10-second intervals.
Mini Cheesecakes Recipe Substitutions and Variations
Substitutes for Ingredients—Graham Cracker Crumbs: Replace with the same amount of crushed digestive biscuits or vanilla wafers.
Granulated sugar: Substitute with the same quantity of coconut sugar or superfine sugar to yield a different flavor profile.
Coconut oil or margarine (melted): Use an equal amount in place of unsalted butter.
Neufchâtel cheese or non-dairy cream cheese can substitute for cream cheese for a lighter or dairy-free option.
Cream: Heavy cream is hard to find in the tropics, but substitutes can be found.
Coconut milk: Substitute with full-fat coconut milk or half-and-half.
Same damn thing. Cows produce milk; coconuts do not.
Pro Tips
1. Room Temperature Ingredients: Make sure the cream cheese, eggs, sour cream, and heavy cream are at room temperature before mixing. This will ensure a smoother batter and prevent lumps in your cheesecake.
2. Avoid Overmixing: After adding the eggs, mix the batter gently to avoid incorporating too much air, which can cause the cheesecakes to rise and then fall during baking.
3. Even Crusts: Press the graham cracker crust mixture firmly and evenly into the bottom of the muffin cups. Using a small flat-bottomed glass or a spoon can help achieve an even layer.
4. Check for Doneness: The cheesecakes are done when they are set but still have a slight wobble in the center. They will continue to firm up as they cool. Over-baking can lead to cracks.
5. Chilling Time: For the best flavor and texture, allow the cheesecakes to chill in the refrigerator for at least 4 hours or overnight. This helps them fully set and enhances their creamy texture.
Mini Cheesecakes Recipe
My favorite Mini Cheesecakes Recipe
Equipment Needed:
1. Oven
2. Muffin tin (12-cup)
3. Paper liners
4. Small mixing bowl
5. Large mixing bowl
6. Mixing spoon or spatula
7. Electric mixer or whisk
8. Measuring cups
9. Measuring spoons
10. Spoon or spatula for distributing batter
Ingredients:
- 1 cup (120g) graham cracker crumbs
- 2 tablespoons (25g) granulated sugar
- 4 tablespoons (56g) unsalted butter, melted
- 16 ounces (450g) cream cheese, softened
- 1/2 cup (100g) granulated sugar
- 1 teaspoon vanilla extract
- 2 large eggs
- 1/4 cup (60ml) sour cream
- 1/4 cup (60ml) heavy cream
Instructions:
1. Set your oven for 325 degrees Fahrenheit (163 degrees Celsius) and prepare a muffin tin that holds 12 cups by putting in paper liners.
2. In a tiny bowl, amalgamate graham biscuit crumbs, 2 tablespoons of sugar, and melted butter. Stir until the crumbs are uniformly damp.
3. Distribute the crumb mixture among the muffin cups, pressing it firmly into the bottom to form the crust.
4. In a spacious mixing bowl, combine softened cream cheese and sugar. Beat them together until they’re a smooth and creamy mixture.
5. Add the vanilla extract and mix to blend.
6. One at a time, beat in the eggs, making sure each is completely incorporated before adding the next.
7. Blend in the sour cream and heavy cream, stirring just until smooth.
8. Distribute the cheesecake batter evenly over the prepared crusts in the muffin cups.
9. Cook for 18-20 mins, or until the insides are firm yet still a little wobbly. Don’t let them bake too long.
10. Let cheesecakes cool to room temperature. Then refrigerate them for at least 2 hours before serving.


