
I turned a store-bought angel food cake and just four ingredients into a show-stopping Strawberry Angel Cake that looks like it took hours to make.
I couldn’t believe how dramatic a simple store bought angel food cake and fresh strawberries could look, but there it was on my counter like it owed me money. I tossed it together on a whim and my friends started calling it Strawberry Angel Cake while others pinned it under Angel Food Cake Desserts, and that made me grin.
It reads way more fancy than it should, there’s a playful surprise in every bite that makes people ask questions, even though it’s barely any fuss. I still don’t know why it’s so addictive, maybe you’ll figure out the secret before I do.
Ingredients

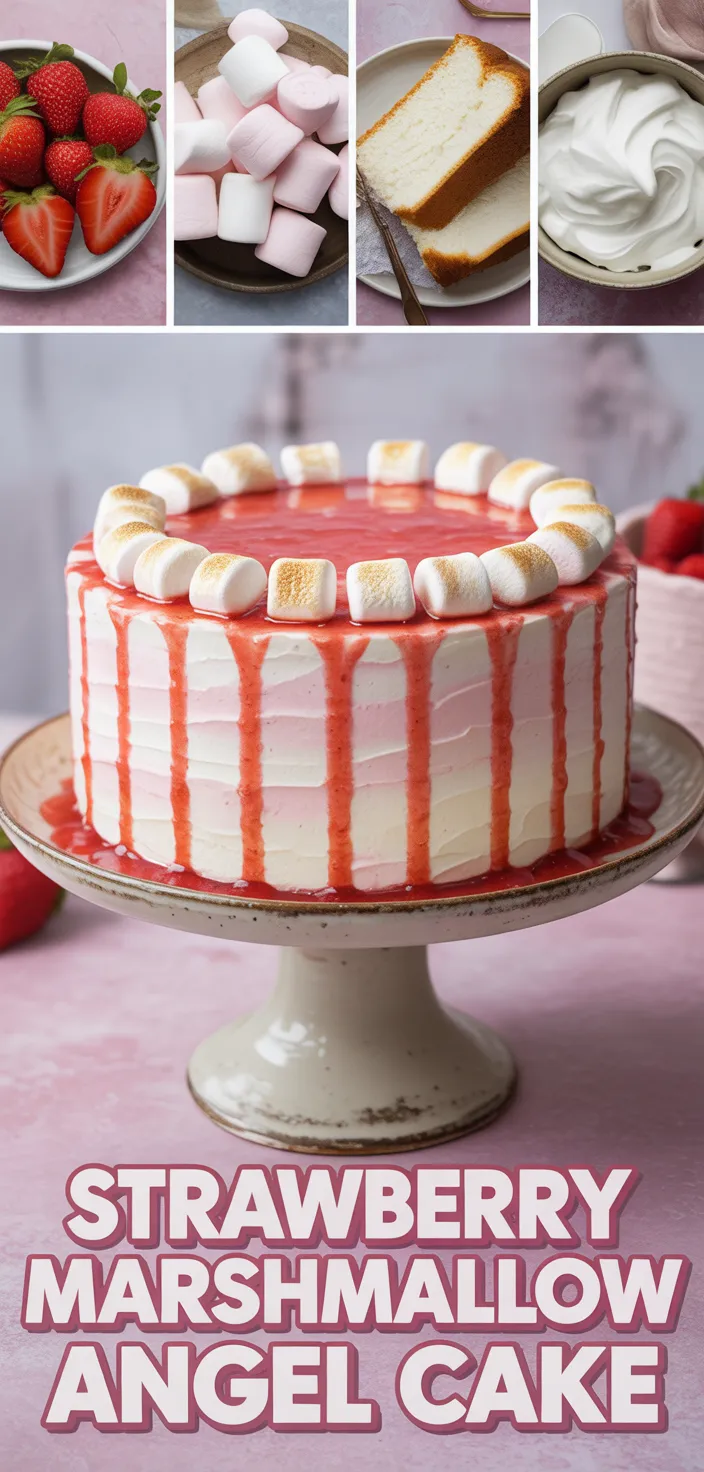
- Angel food cake: airy, lower fat than regular cake, mostly carbs and sugar.
- Fresh strawberries: tart sweet, rich in vitamin C and fiber, bright fruity burst.
- Marshmallow creme: sticky, super sweet and sugary, gives gooey texture and nostalgia.
- Whipped topping: cool and creamy, light sweetness mostly air and sugar, smooth finish.
Ingredient Quantities
- 1 store bought angel food cake (10 to 12 ounce)
- 3 cups fresh strawberries, hulled and sliced
- 7 ounce jar marshmallow creme
- 8 ounce container whipped topping, thawed
How to Make this
1. Chill the store bought angel food cake in the fridge for 15 to 20 minutes, it makes slicing so much easier. Place cake on a cutting board and, with a long serrated knife, cut it horizontally into 2 or 3 even layers depending on how thick you want them.
2. Hull and slice 3 cups fresh strawberries, set about 1 cup of the prettier slices aside for the top. Let the rest sit in a bowl for 5 to 10 minutes so they loosen up and release a little juice, that helps the cake taste brighter.
3. Scoop the entire 7 ounce jar of marshmallow creme into a medium bowl and microwave for 8 to 12 seconds to loosen it if it seems stiff, stir it smooth. Dont heat too long, you just want it spreadable.
4. Gently fold the thawed 8 ounce container of whipped topping into the marshmallow creme until evenly combined and light, use a rubber spatula and fold so you dont deflate it.
5. Put the bottom cake layer on your serving plate, spread about a third of the marshmallow-whip mixture evenly over it, then top with a single layer of the sliced strawberries, press gently so they stick.
6. Repeat with the next cake layer(s): add another third of the filling, more strawberries, then the final cake layer. Reserve a little filling for the top if you like a smooth finish.
7. Spread the remaining filling over the top layer and arrange the reserved strawberry slices decoratively. Let some of the berry juices drip down the sides for a pretty, rustic look, dont overdo it or the cake will get soggy.
8. Refrigerate the assembled cake at least 1 hour to let the layers set and the flavors meld. For cleaner slices chill 2 to 3 hours, and when cutting, use a serrated knife wiped clean between each slice.
9. Store leftovers covered in the fridge up to 2 days, its best the first day though. If the strawberries have released lots of juice before assembling, drain a bit so the cake doesnt get soggy.
10. Quick tip: if you want firmer cutting, freeze the whole cake 20 to 30 minutes before slicing, it keeps layers intact and makes neater pieces.
Equipment Needed
1. Refrigerator for chilling the cake and setting the layers
2. Microwave (or small stove top safe bowl) to loosen the marshmallow creme if it’s stiff
3. Cutting board, a big one so the cake sits flat
4. Long serrated knife for horizontal slicing, wipe it clean between cuts
5. 1 medium bowl for the marshmallow and whipped topping mix
6. 1 medium bowl for the strawberries to macerate a bit
7. Rubber spatula for folding and spreading, dont deflate the whipped topping
8. Offset spatula or butter knife for smoother spreads and finishing the top
9. Serving plate or cake stand to assemble and chill the cake
FAQ
Strawberry Marshmallow Angel Cake Recipe Substitutions and Variations
- Angel food cake: try a store bought sponge cake or chiffon cake for similar airiness. A denser cake like pound cake works too, but expect a heavier bite.
- Fresh strawberries: swap with raspberries, blueberries, or thinly sliced peaches. Frozen berries are fine after thawing and draining, though they might be a bit watery.
- Marshmallow creme: use mini marshmallows melted with 1 to 2 tablespoons milk or corn syrup until spreadable, or a jar of marshmallow fluff if you find it.
- Whipped topping: replace with 8 ounces heavy cream whipped with 2 to 3 tablespoons powdered sugar, or use coconut whipped cream for a dairy free option.
Pro Tips
1. Chill then slightly freeze and warm the knife: after assembly pop the cake in the freezer for 20 to 30 minutes it firms up the layers so you get neater slices. Right before cutting run your serrated knife under hot water, dry it with a towel and wipe between each slice for cleaner edges.
2. Keep the cake from getting soggy: macerate the strawberries only if they need it, then pour off and save the extra juice. If you want extra shine spoon a tiny bit back on top when serving but dont dump it on or the cake will turn soggy fast.
3. Make the filling silkier and lighter: microwave the marshmallow creme just a few seconds if stiff then whisk it smooth, fold the thawed whipped topping in with gentle sweeping motions so you keep the air. Overmixing will kill the fluff and make the filling runny.
4. Easy assembly and storage hacks: use a piping bag or a zip top bag with the tip snipped to put filling near the edges so the strawberries dont slide, reserve the nicest slices for the top. Cover loosely in the fridge so it doesnt absorb other smells and eat within a day or two its best day one.
Strawberry Marshmallow Angel Cake Recipe
I turned a store-bought angel food cake and just four ingredients into a show-stopping Strawberry Angel Cake that looks like it took hours to make.
8
servings
273
kcal
Equipment: 1. Refrigerator for chilling the cake and setting the layers
2. Microwave (or small stove top safe bowl) to loosen the marshmallow creme if it’s stiff
3. Cutting board, a big one so the cake sits flat
4. Long serrated knife for horizontal slicing, wipe it clean between cuts
5. 1 medium bowl for the marshmallow and whipped topping mix
6. 1 medium bowl for the strawberries to macerate a bit
7. Rubber spatula for folding and spreading, dont deflate the whipped topping
8. Offset spatula or butter knife for smoother spreads and finishing the top
9. Serving plate or cake stand to assemble and chill the cake
Ingredients
-
1 store bought angel food cake (10 to 12 ounce)
-
3 cups fresh strawberries, hulled and sliced
-
7 ounce jar marshmallow creme
-
8 ounce container whipped topping, thawed
Directions
- Chill the store bought angel food cake in the fridge for 15 to 20 minutes, it makes slicing so much easier. Place cake on a cutting board and, with a long serrated knife, cut it horizontally into 2 or 3 even layers depending on how thick you want them.
- Hull and slice 3 cups fresh strawberries, set about 1 cup of the prettier slices aside for the top. Let the rest sit in a bowl for 5 to 10 minutes so they loosen up and release a little juice, that helps the cake taste brighter.
- Scoop the entire 7 ounce jar of marshmallow creme into a medium bowl and microwave for 8 to 12 seconds to loosen it if it seems stiff, stir it smooth. Dont heat too long, you just want it spreadable.
- Gently fold the thawed 8 ounce container of whipped topping into the marshmallow creme until evenly combined and light, use a rubber spatula and fold so you dont deflate it.
- Put the bottom cake layer on your serving plate, spread about a third of the marshmallow-whip mixture evenly over it, then top with a single layer of the sliced strawberries, press gently so they stick.
- Repeat with the next cake layer(s): add another third of the filling, more strawberries, then the final cake layer. Reserve a little filling for the top if you like a smooth finish.
- Spread the remaining filling over the top layer and arrange the reserved strawberry slices decoratively. Let some of the berry juices drip down the sides for a pretty, rustic look, dont overdo it or the cake will get soggy.
- Refrigerate the assembled cake at least 1 hour to let the layers set and the flavors meld. For cleaner slices chill 2 to 3 hours, and when cutting, use a serrated knife wiped clean between each slice.
- Store leftovers covered in the fridge up to 2 days, its best the first day though. If the strawberries have released lots of juice before assembling, drain a bit so the cake doesnt get soggy.
- Quick tip: if you want firmer cutting, freeze the whole cake 20 to 30 minutes before slicing, it keeps layers intact and makes neater pieces.
Notes
- Below you’ll find my best estimate of this recipe’s nutrition facts. Treat the numbers as a guide rather than a rule—great food should nourish both body and spirit. Figures are approximate, and the website owner assumes no liability for any inaccuracies in this recipe.
Nutrition Facts
- Serving Size: 145g
- Total number of serves: 8
- Calories: 273kcal
- Fat: 9.84g
- Saturated Fat: 5.82g
- Trans Fat: 0.0625g
- Polyunsaturated: 0.625g
- Monounsaturated: 1.875g
- Cholesterol: 0mg
- Sodium: 178mg
- Potassium: 112.25mg
- Carbohydrates: 51.51g
- Fiber: 1.51g
- Sugar: 32.79g
- Protein: 3.13g
- Vitamin A: 18.75IU
- Vitamin C: 33.5mg
- Calcium: 20.38mg
- Iron: 0.625mg


